
Friday 29th July 2011
So I have the bug and couldn't help myself yesterday :) I played around and came up with another Alphabet, great for travel themed projects (hence the name) The maps I used for the alphabet are of Melbourne and Victoria (Australia) as I have some photos/projects related to it but if you are after a specific area to personalise the font it is easy to make your own OR let me know and I will see what I can do to help. The Alphabet includes 36 .png files, upper case alphabet and numbers. It looks good if you add a border (stroke) around the edge, kinda makes it pop. As before feel free to share but please point people back here to download it.

Download it HERE
Thursday 28th July 2011
Yesterday I was busy working on an alphabet for Digital Scrapbooking. The font I chose is one of my favourites and I plan on making a few more in different colours. This one has been done using some ledger paper and I am quite happy with the results. There are 71 .png files in total including lower and upper case alphabet, numbers and punctuation. I have decided to share it with you as a freebie :) If you want to share it though please point people back here to download it.

Download it HERE.
Tuesday 26th July 2011
Here is the second set of Photoshop Brushes I made the other day , you can download them from here - Vintage Findings Set 2
Six more brushes including the background book print, hot air balloon, vintage key, birdcage on stand, bee and a vintage bicycle.

Sunday 24th July 2011
This 'how to' is an all in one. How to add Photoshop brushes, save the brushes as a set for sharing and deleting unwanted brushes.
Photoshop Tip :: Try using your Photoshop brushes with the eraser tool, you can come up with some very nice effects when used on photos.
If you need to share a file(s) over the internet big or small I have found SendSpace to be fairly easy to use. They offer free accounts (SendSpace Lite) or paid accounts, the difference being that with the free accounts you will get some pop ups when you click on the download file link. I used them for the PS brush set recently and will continue to use them (unless I find somewhere else that suits me better).
Check them out -If you need to share a file(s) over the internet big or small I have found SendSpace to be fairly easy to use. They offer free accounts (SendSpace Lite) or paid accounts, the difference being that with the free accounts you will get some pop ups when you click on the download file link. I used them for the PS brush set recently and will continue to use them (unless I find somewhere else that suits me better).

Thursday 21st July 2011
Yesterday when I was playing around in Photoshop I made some new brushes, so I am going to share them with you. A set of 6 brushes - old newspaper (great for backgrounds), vintage dress form, vintage perfume bottle, little birdie, crown, and a vintage sewing machine.
You can download them here - Vintage Findings Set 1 Download
I hope you can put them to good use :)

Friday 15/7/2011
Did you know that Mac's have some cool inbuilt features.
After searching the internet high and low on what I can use to video capture my computer screen without buying an app, I finally found out I have all I need to do just that already loaded on my iMac (I love Apple).
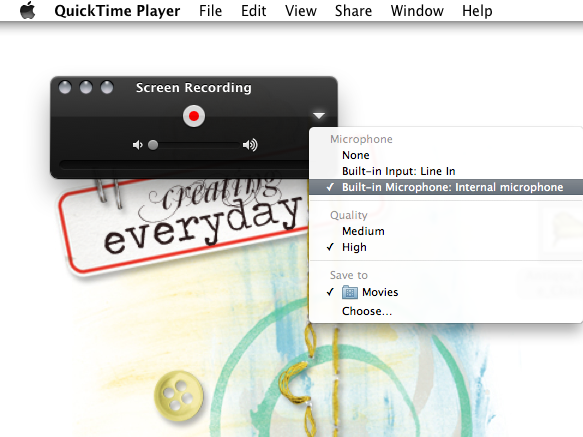
You can use Quicktime Player to record the activity on your screen with OR without sound/voice over AND it saves it as a .mov file which means it is easy to edit in iMovie (which comes loaded on the iMac) and upload to YouTube. I downloaded several of the free apps out there on the market and I wouldn't say that any of them are perfect. I used Jing yesterday and it is really easy to use and I loved it up until I realised I cannot upload the file to YouTube as it saves it as a .swf - pain in the butt, hence my ongoing search for an alternative.
Quick 'how to' -
Open Quicktime Player
Click on File in the menu and select New Screen Recording

Easy! If you want to add sound just click on the arrow in the bottom right corner and select the mic input and adjust the volume in the slide bar below the red record button. Just make sure that the volume on your speakers is turned down before you record otherwise you will end up with some wicked feedback :)
Digital Colour Meter is another app that comes standard on Macs. Ever wanted to know what the code for a certain colour was so you can reuse that colour? Digital Colour Meter will tell you.
Go to your Apps folder and click on the Utilities folder. This is where you will find Digital Colour Meter. Hover your mouse over the colour on your screen and it will tell you the colour value in several different formats.

I hope I have enlightened some of you, I will be back with more soon.

Thursday 14/7/2011
While setting up this blog (and personalising my twitter account) I used Photoshop to create the backgrounds. One of the things I did was make my own brush (.abr), it is very easy to do and you can make brushes from just about anything. You might want it to be words eg.. logo or name for a watermark on photos, or make one from a photo you have on your computer.
I made one from a picture I had on my computer (not sure where I got it from), so I thought I would make a little 'how to' video on how you too can make your own Photoshop brushes, it also shows you how to make a brush from text.
Side note : I am using an iMac with Photoshop CS5, the bigger the image/graphic the better - up to 2500 x 2500 pixels, for the 'how to' I have made them small.
Here is a link to view the 'How to' in it's original format - Photoshop Brushes
I used Jing for the video capture, it's free and easy to use.
I will also add that I have used Billy Argel's font Monbijoux which you can get via his blog.
Let me know if you have any questions :)
Wednesday 13/7/2011
Today I created the backgrounds and header for this blog and twitter page. I love playing around in Photoshop and sometimes get carried away. I am happy with the results, simple and clean. I will be back with some how to's later on :)